Mounts are the parts nobody specifies carefully until something moves. A motor mount that flexes shifts belt alignment; an equipment mount that resonates transmits noise through a whole frame; a mount with holes drilled 2 mm off standard costs an installer an hour per unit. Custom metal mounts solve those problems by putting the load path, the hole pattern, and the isolation strategy in one deliberate design instead of stacking generic brackets.
This guide covers how buyers specify custom metal mounts that hold alignment: choosing the load-path geometry, picking material and thickness, deciding between sheet fabrication and machined plate, managing weld distortion, and selecting a finish that survives the installation environment.
What a Mount Has to Do
A mount carries static weight, reacts dynamic loads, sets position, and often provides isolation — four jobs that pull in different directions. Stiffness holds alignment but transmits vibration. Compliance absorbs vibration but lets things move. The design decision is where on that spectrum your application sits, and that has to be settled before any geometry is drawn.
Position accuracy is the requirement most often under-specified. If a mount locates a gearbox relative to a shaft, the hole-to-hole tolerance and the flatness of the seating face matter far more than the outline. Calling out those two features and leaving the rest open is how you get an accurate mount at a fabricated price. The broader design principles in our custom metal brackets guide apply directly.
Mount Types by Load Path
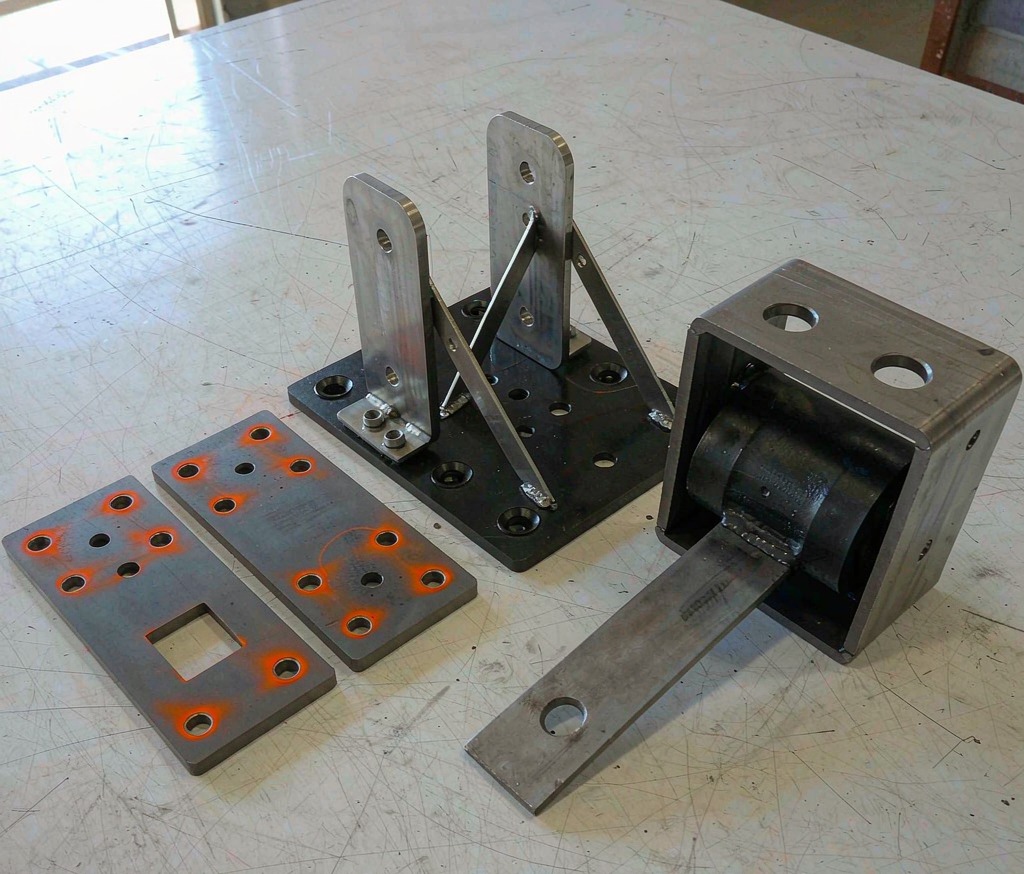
Plate mounts spread load over a flat surface and are the simplest and cheapest. Angle and L-mounts transfer load through a bend and need a gusset once the moment arm grows. Pedestal and standoff mounts raise equipment and are dominated by buckling and base bending. Trunnion and pivot mounts carry rotating loads and need bearing-quality bores. Isolation mounts sandwich an elastomer between two metal plates and are designed around the isolator, not the metal.
Choose the family by drawing the load path from the equipment to the structure and finding the weakest link. Most failures are not material failures — they are bending at an unsupported bend or fatigue at a hole too close to an edge. A two-millimetre thickness increase or a single gusset usually costs less than a redesign after field failures.
Material and Thickness Selection
Cold-rolled and hot-rolled mild steel in 2–10 mm covers most industrial mounts, is easy to weld, and takes any finish. Structural grades such as S355 or A572 give higher yield where weight matters. 5052 and 6061 aluminium reduce mass roughly two-thirds at a stiffness penalty, so aluminium mounts usually need a thicker section or a rib. Stainless 304 and 316 are specified for washdown, marine, and food environments.
Thickness should follow deflection, not intuition. Doubling thickness increases bending stiffness roughly eightfold in a plate, so a modest thickness increase often removes the need for a gusset and a weld — cheaper overall despite the extra material. Where the mount is a machined component rather than a fabrication, plate or bar stock through CNC milling gives flatness and hole accuracy that sheet forming cannot.
Fabrication Routes: Sheet, Plate, and Machined
Sheet mounts start with %s or punching, then bending. This is the fastest and lowest-tooling route and covers thickness up to about 8 mm for most bend geometries. Bends are formed on a press brake through %s, and bend radius, K-factor, and grain direction all need to be agreed before flat patterns are cut, or the finished dimensions will drift.
Plate mounts above roughly 10 mm move to plasma or laser cutting with machined critical faces. Fully machined mounts are used when flatness under 0.1 mm or bore tolerances under 0.05 mm are required. Our sheet metal processing cells cover the sheet routes end to end, and the trade-offs are laid out in our sheet metal fabrication guide. Complex mounts that enclose equipment often merge into the housing itself — see custom metal housings.
Welding, Gussets, and Distortion Control
Welding is where accurate flat patterns turn into inaccurate assemblies. Heat input pulls material, so weld sequence, fixture design, and intermittent stitching matter as much as the weld itself. We fixture mounts to hold datum faces, balance welds about the neutral axis, and use MIG welding for structural joints where penetration is needed, reserving stitch welds for non-load-bearing tabs.
Gussets and formed ribs are the cheapest stiffness available. A single triangular gusset at a loaded bend can triple the moment capacity for a few cents of material. Where flatness must be guaranteed after welding, we either machine the seating face post-weld or stress relieve before final machining — both cost less than shimming units in the field.
Vibration Isolation and Fastener Strategy
Isolation works by putting a compliant element between two stiff ones and tuning the natural frequency well below the excitation frequency. Elastomeric pads, wire-rope isolators, and spring mounts each have a usable frequency band; the metal parts of the mount should be stiff so the isolator does the work. Building compliance into the metal instead of the isolator produces unpredictable results and fatigue cracks.
Fasteners deserve equal attention. Slots instead of holes absorb build tolerance and cut installation time. Clinch nuts and weld studs turn a two-hand assembly into one-hand. Specify edge distance at least twice the hole diameter, and note the fastener grade and torque on the drawing so the joint is designed rather than assumed.
Finishing and Corrosion Protection
Powder coating is the volume default for steel mounts: it covers edges well, resists chipping, and comes in any RAL colour. Zinc plating suits parts that must stay dimensionally exact or need electrical continuity. Hot-dip galvanising is right for outdoor structural mounts. Stainless mounts are usually passivated and brushed rather than coated. Colour, gloss, and thickness expectations are agreed at the quotation stage.
Masking is a real cost item. Threaded holes, bearing bores, and grounding pads must be masked or post-machined, and every masked feature adds labour. Deciding early whether a face is functional or cosmetic keeps the finishing bill under control.
Inspection, Cost Drivers, and Lead Time
We inspect mounts on hole-to-hole dimensions, seating flatness, bend angle, weld quality, and coating thickness. First-article reports reference your datum scheme, and fabricated assemblies are checked in a fixture that simulates the mating structure so hole patterns are verified in the condition they will be used.
Cost is driven by cut length, number of bends, weld length, masked features, and finish. Reducing bend count and consolidating fasteners moves the price more than material choice does. Typical schedules: 5–10 days for laser-cut and formed prototypes, 2–3 weeks for production lots including powder coating, and 3–4 weeks for welded assemblies with machined faces.
Frequently Asked Questions
What tolerance can you hold on mount hole patterns?
Laser-cut hole patterns hold ±0.15 mm within a flat pattern. Across a bend, expect ±0.5 mm unless the feature is machined after forming, which gets you to ±0.05 mm.
Should I use aluminium or steel for equipment mounts?
Steel for stiffness per dollar and easy welding; aluminium when weight matters and you can accept a thicker section or a rib to recover stiffness.
Can you weld and machine in the same supply chain?
Yes. Welded mounts that need flat seating faces or accurate bores are stress relieved and then machined in-house, so you get one supplier and one inspection report.
Do you supply mounts with clinch nuts or weld studs?
Yes. Clinch nuts, weld studs, and standoffs are installed inline and included in the quoted price, which reduces your assembly labour.
What finish is best for outdoor mounts?
Hot-dip galvanising for structural outdoor duty, powder coating over a zinc-rich primer for painted outdoor parts, and 316 stainless where chlorides are present.
What is the minimum order quantity?
Prototypes start at 1–5 pieces since laser cutting needs no tooling. Production pricing improves noticeably from 100 pieces and again above 500.
Ready to Start Your Project?
Get a build-ready quote on your custom metal parts within 24 hours. Share your drawing and our engineers will respond with process, lead time, and pricing.